
|
|
|
#1
 04-12-2013, 09:09 PM
|
|||||
|
|||||
|
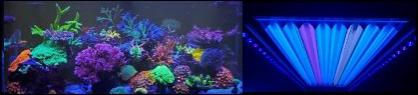
Well I figured since I did an intro thread and promised a Journal ages ago ... its time to give you folks some photos.
I've been poking around on this forum but haven't been overly active up to this point. I've been making lots of changes to my reef though, and figure its time to document them. It won't be as jammed pack as my original thread on my local forum ... but thats only because there are now too many photos to sift through lol. So I guess I'll start with the details. Thank tank is a custom built, starphire front with black silicone, Euro braced tank with a coast to coast overflow and Beananimal standpipes. Lets just get to the photos ... I know thats what everyone is going to want anyway lol 
|
|
#2
04-12-2013, 09:31 PM
|
|||||
|
|||||
|
The DIY Stand. I built the frame of the stand out of 2x6 lumber to prevent the need for a center brace.
 Just basic good one side plywood for the top and the inside bottom since you weren't going to see it anyway.  Then I assembled the face frames. I originally wanted to build my stand out of maple, however I live in Thompson and you can't be overly picky here. Red oak was available, so Red Oak is what I ended up going with.  Once I had the face frames completed, I began building up some pillars to add some 3D depth to the stand. This was going to be a show tank, so I had to adventure out a little further with my woodworking ability and try and a few new things.  This photo shows a little better how I built up the pillars  And the look of the stand before I added any of the trim   The Rail cap that I built for the top edge of the stand could not be purchased, so I got creative with some oak and my router and made it myself. The trim that you see on the bottom of the stand is actually purchased, its the only trim I was able to buy rather than make. Its a standard 3 1/2" oak baseboard for your walls.  This photo shows the assembly of the rail cap. I designed it so that no end grain would show through when everything is finished. End Grain stains darker than everything else, and I didn't want that to happen on this build.  Then I cut pieces of oak to fill the tops of the built up material at the tops of the pillars.  a 3/4" cove bit and 1/2" 3step bit allowed me to make the trim that finished off the pillars. Here is a close up that shows each of those in one shot. The baseboard on the bottom, the cove that hides the mitres, and the step to provide a smoother transition inside of the pillars.   Then came the stain. I went with a water based Mahogany and 3 coats of water based Poly.    The Canopy was built in a very similar fashion so I won't bother with build photo's. here it is before stain and doors.  With the stain applied. I also painted the inside white with a high gloss acrylic paint. This will help to reflect more light than a dark interior would, directing the light into the tank.  Shiny Shiny lol  And the Canopy with Doors: 
|
|
#3
04-12-2013, 09:38 PM
|
|||||
|
|||||
|
My god thats some amazing wood working skills you got there!!!! Beautiful!
Wanna come finish my stand??
__________________
 They call it addiction for a reason...
|
|
#4
04-12-2013, 10:11 PM
|
|||||
|
|||||
 Wow, that's beautiful woodwork!!! Looks like you've got the canopy on a tank, so let's see some more!!! Wow, that's beautiful woodwork!!! Looks like you've got the canopy on a tank, so let's see some more!!!Thanks for sharing!
__________________
My 180 GL Reef Tank http://www.canreef.com/vbulletin/showthread.php?t=81842 My 55 GL Reef Tank - shut down http://www.canreef.com/vbulletin/showthread.php?t=87764
|
|
#6
04-12-2013, 11:15 PM
|
|||||
|
|||||
|
Quote:
The next step I took care of was soldering up my DIY LED's. I purchased 3 heat sinks, and made 3 separate units. Each unit contained 12 Royal Blue (460nm) and 12 Cool Whites (6500K) wired into meanwell drivers controlled by RapidLED's dimmable controller.   White Test:  Blue Test:  They work! Time to mount Oh wait ... pure Chaos!!  Chaos Cleaned up  You can see that the right side is whiter than the left side. This meant that I needed to adjust the SVR2 setting on the driver for the blues on the left pendant which was taking slightly more amperage than the others. A close up of a single heat sink 
|
|
#7
04-12-2013, 11:26 PM
|
|||||
|
|||||
|
Time to move back one step ... because the canopy was built after I had the plumbing done ... but it screwed up my sequence for the Journal.
So lets get to the plumbing. First the tank needed to be drilled. Plumbers putty and a bit of patience to the rescue:  And thanks to trickery of photography ... I'm done   After the holes were drilled I painted the back ...  And then began construction on the Coast to Coast Overflow  And voila!  The pump is a Reeflo Dart (3600 GPH)    And because I used the Beananimal overflow ... 3 standpipes  There is also a 1" line that diverts from my 1.5" piping on the return that circulates back into the sump. This is for a filter sock. But because my overflow doesn't go to the sock, there is a 0% chance of an overflow because of a plugged filter sock.  The return on the pump is diverted into 4 separate outlets of loc-line that have fan nozzles and locline ball valves. This gives me full control in terms of flow. If I have a piece that can't handle the high flow, I can turn down 1 of the ball valves decreasing the flow in one area and increasing it in another.  
|
|
#8
04-13-2013, 02:47 AM
|
|||||
|
|||||
|
nice bro looking really good. where is the fans for the heat sink
__________________
180 starfire front, LPS, millipora Doesn't matter how much you have been reading until you take the plunge. You don't know as much as you think.
|
|
#9
04-13-2013, 04:00 PM
|
|||||
|
|||||
|
Quote:
Quote:
Quote:
|
|
#10
04-13-2013, 04:29 PM
|
|||||
|
|||||
|
Very nice work. Hope you don't mind, but I copied a couple of your corner post pics. I saw something similar on a reefcentral post a while back but couldn't find it again. I'll save it for posterity
 An idea I saw (I can't remember where) for hanging heatsinks is run them on pocket door track. That way when you have to work in your tank you can just push them back on the rail and they're not hanging in your way. Just a though if you hadn't seen it done.
|


 Linear Mode

