
|
|
|
#101
 04-12-2010, 07:07 PM
|
|||||
|
|||||
|
Looks Great. So neat and tidy. It's inspiring some changes to my system
J |
|
#102
04-12-2010, 10:52 PM
|
|||||
|
|||||
|
Well they are here wahoo fan fare round of applause, go sell the cat to buy them
The Bubble Magus balling canisters are here so i can now start the GHL doser and balling light review and set up guide so many have asked me for that have GHl dosers. First some pics So here is the new eye candy 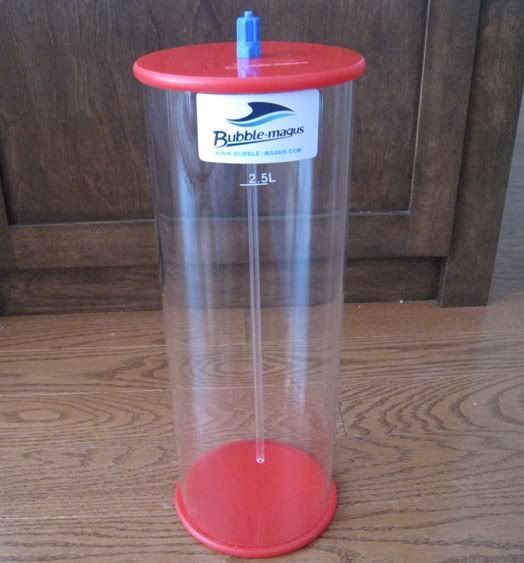 And this is what makes up the balling kit. 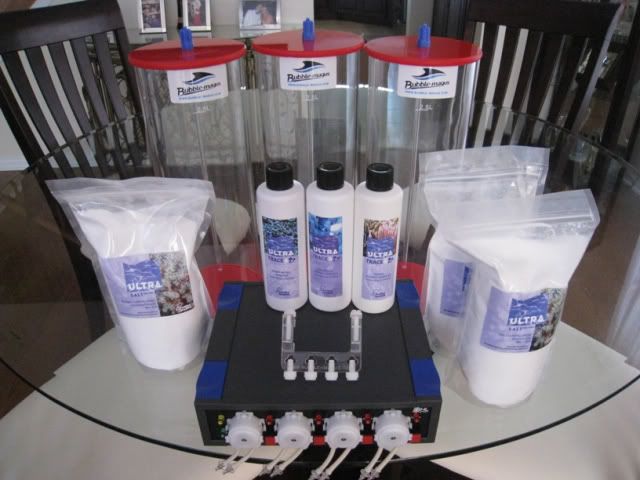 So in the picture we have 3 x Bubble Magus 2.5L canisters (also available in 5.0L) ideal for balling mixtures 3 x Fauna marin balling salts, no I am not using cheap salts that I have no clue what has been added to them or not, FM salts are designed for the tank  3 x FM trace B elements, for that all important colouration of the corals 1 x Bubble magus tubing holder, I was amazed at the attention to detail and quality iin such a simple item  1 x GHL doser :bounce3: If anyone is interested in balling or especially the containers and tube holders or anything for that matter I talk about here, all Aqua Digital dealers carry it all so drop them or me a line for more info. We can supply any dealer you wish For reading up on this concept here is the manual http://shop.faunamarin.de/media/cont...K-comm_ENG.doc So the next step is set up. Tomorrow I will insert the GHL doser into the cabinet and drill the 8 holes required to run the 1/4 hoses through the shelf, I say 8 as one pump will be used for AWC at 1L a day when i finally get that set up. More to follow tomorrow Last edited by Aqua-Digital; 04-12-2010 at 11:14 PM. |
|
#103
04-12-2010, 11:16 PM
|
|||||
|
|||||
|
Yup, thats some nice candy. You should always buy extra so you can share you know
__________________
Mike 150g reef, 55g sump, T5's, Vertech 200A, Profilux III - German made is highly over rated, should just say Gerpan made. Reefkeeper - individual obsessed with placing disturbing amounts of electricity and seawater in close proximity for the purpose of maintaining live coral reef organisms. |
|
#104
04-12-2010, 11:21 PM
|
|||||
|
|||||
|
I did - 150 of each size
2.5L are $59.00 5.0L are $74.00 Tube holders are $29.00 |
|
#105
04-13-2010, 01:27 AM
|
|||||
|
|||||
|
I've been thinking about doing the balling method for a bit now, but there seems to be very little journals with progress posted using the full kit. looking forward to what your doing here.
I love how clean those bubble magus containers are too. Makes everything look less like a science project! |
|
#106
04-13-2010, 01:46 AM
|
|||||
|
|||||
|
Quote:
__________________
28g Nano Cube drilled with 13g sump in stock stand. Vertex IN80 Skimmer, Phosban 150 Reactor, Apex Controller, DIY LED with stock hood, dimmable Established March 2006 |
|
#107
04-13-2010, 11:02 PM
|
|||||
|
|||||
|
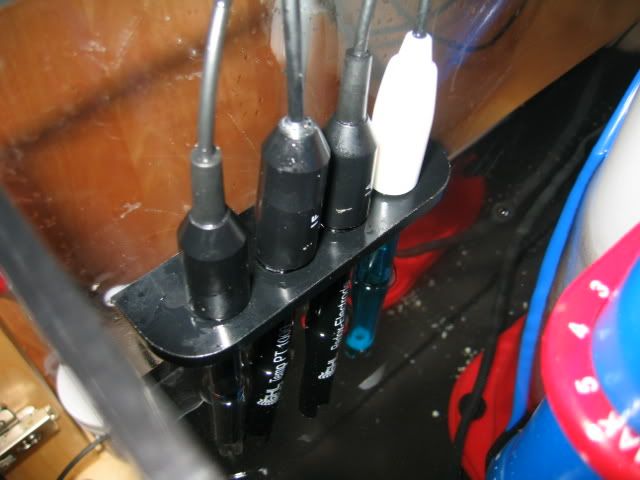
Forgot to ask, I see you have the new PH probe in your array of probes. How's it working out ? Is it available in stores yet ? I ordered one from Progressive Reef but havent heard anything back yet.
__________________
Mike 150g reef, 55g sump, T5's, Vertech 200A, Profilux III - German made is highly over rated, should just say Gerpan made. Reefkeeper - individual obsessed with placing disturbing amounts of electricity and seawater in close proximity for the purpose of maintaining live coral reef organisms. |
|
#108
04-13-2010, 11:20 PM
|
|||||
|
|||||
|
Hi
In regards to the balling review, of course this will take some time for anyone to see results and of course it all comes down to "are we seeing results that we would have anyway" So I would suggest look more at the parameter stability, the ease of control over the 3 elements, something you will neve get with 2 part or a ca reactor an then build your own assesment from there. I also would say there is no point following the review if you then go off and buy some bargain bucket salt and hope to see the same results. Simply you wont, so if you are interested in doing balling then ya have to buy into the concept 100%. I have talked to enough people that switched to FM salts and in a month they got stability back and algal issues resolved. This is "my" first tank run with balling so I am going to be interested also THE PROBE Amazing product - rapid response, comes with documentation showing its stats and has not needed calibrating in 6 weeks. The great thing is the price is no different. Talk to PR again about your interest in one, we have a few left from the initial shipment. Does it match a GHL Lab probe? Based on warranty (GHL 6 months) this probe 3 months and that I have GHL probes that are nearly 4 years old and still going great guns, I would say the GHL still holds its own with time against cost, basically paying for itself due to longevity. I of course am going to be really interested to see how this new probe is performing in 12 months. Last edited by Aqua-Digital; 04-13-2010 at 11:24 PM. |
|
#109
04-15-2010, 12:40 AM
|
|||||
|
|||||
|
The equipment set up.
As you can see below the whole system is set up minus adding the actual elements which I will do tomorrow. GHL 4 stage doser connected to the profilux and plumbed in 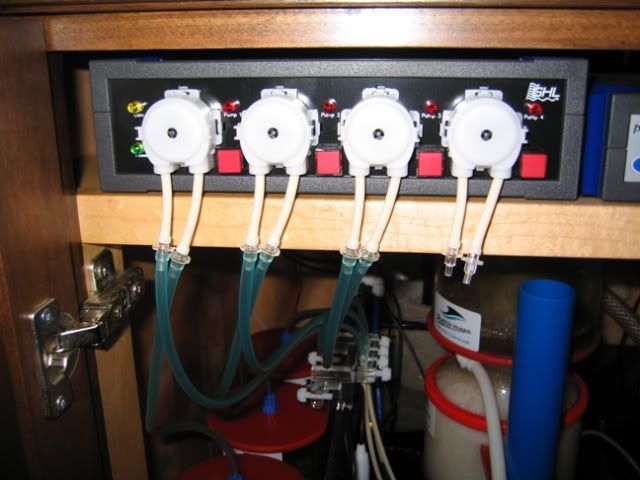 All Pipe work going to the tube holder and coming from the balling containers, the containers come with screw tight fastners for the tube so no risk of one flying off.  Close up of the tube holder, I have been crafty and used spare peri tubing to run through the bubble Magus holder so the pipes are nice and tidy going into the sump. I have also used the more flexible air line as the Calcium line especially can choke up like a vein and is easier to unblock with this pipe. 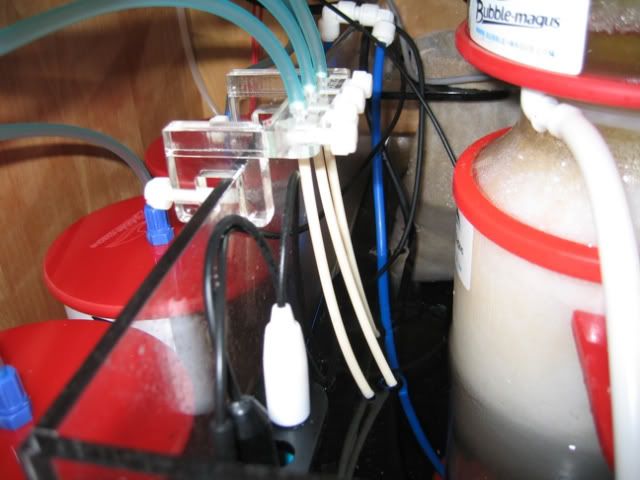 And 1 x stand back and admire the goodies shot 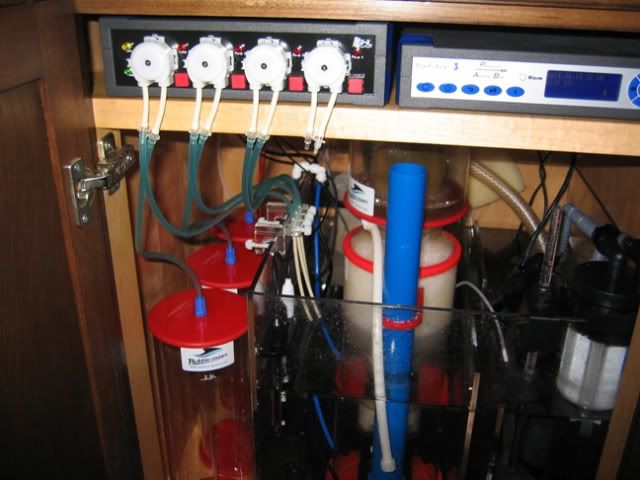 Tomorrow I will discuss GHL programming with screen shots and also how to work out initial dose rates. I have cheated and already done this by 5 days of manual pre dosing and measuring of the element depletion per day, so i know already what my system draws, but I will focus on this important step more tomorrow |


 Linear Mode

