![]() |
|
#1
|
|||||
|
|||||
![]() So good ole level control etc etc
Lets start with the basics. ATO. There are different ways of doing this Direct from the RO unit (my choice) From storage container (most popular) From one of the above controlled by a salinity probe instead of level sensor (advance topic - later) So which ever you choose of the first two the only thing that changes in the set up is what you plug into the assigned power bar socket, whether it be a water solenoid of water pump. In my case water solenoid. So first thing we must do is set a float or optical level sensor up in the sump to the desired (controlled) level point. Here is mine. ![]() 
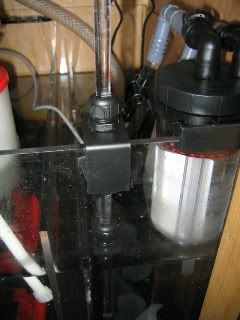
Set up the assembly and loose fit to the sump so it can be adjusted, now go to the profilux front screen and go to level - diagnostic - level 1, adjust the sensor until it just turns off, you now have your level set at where you wish the water to always be maintained at. So back to the software. Go to the level control screen ![]() By now you should have plugged in your sensor to the back of the profilux and not by mistake plugged it into the temperature port instead :celeb1: Double click on Level 1 in the settings tab at the top and up pops - ![]() 
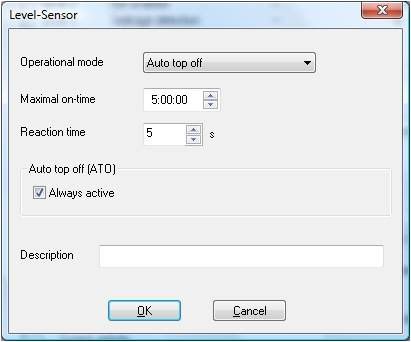
In this box you can set all sorts of treats, the first important thing to set is the function, in this case ATO, the next most important is Max on time, this is your safety net, lets say heavens forbid you forgot to clean your ATO sensor and it stuck on, you are in Cuba and downing a lovely cool local brew while your ATO goes AWOL and floods the Granny apartment below! To avoid such minor issues here you set the maximum time you wish the sensor to be in an active state. So in my case 5 minutes is, well probably to long and needs to adjust that down to 30 seconds, thats a good target. So now you have fail safe ATO ![]() next in the same screen you need to set up the reaction time, no this is not the time you have to get back from Cuba to sort out the mess in the apartment below, but the amount of time the sensor is active before the controlled socket is switched, this is ideal for tanks with turbulance or other things that can make the sensor switch on and off periodically. I have mine set to 5 secs, which is just right. So thats the ATO sensor set up, what about the socket? You have now chosen a socket to control your pump or solenoid. Just as before go to socket function and click edit the chosen socket. Set this to water 1. Waheyy, you now have fail safe fully set up ATO |
#2
|
|||||
|
|||||
![]() So for the topic tonight - water alarms.
You can have all manner of alarms - Maximum on time alarm (this is described in ATO set up) Low water level alarm High water level alarm Leakage alarm Depending on the amount of sensors you have depends on how many alarm states you can create. I have main tank ovefill alarm and max on time ATO alarm and here i will show you how to create an alarm and shut off for the main pump if the drain got blocked. As you can see from the photo I have attached a float level sensor to the Euro brace inside the weir box, the sensor will then be triggered if the water level rises too high, in doing so setting off an alarm and turning off the main pump. You can set the same thing up for low water in your sump by putting the sensor there instead, mounted differently of course. ![]() So how to program? First connect the sensor to a level sensor port. Now go to level control in the software and select the sensor for editing. Set the sensor to leakage detection and set your max on times etc as you choose. ![]() Now go to socket function outlet and choose what socket you want the return pump plugged into then edit this socket as follows ![]() Here you will see I am using sensor 3 so have programmed as water 3. If using an optical sensor, when setting up the socket fnction remember to "invert" the socket function. Thats all for tonight folks ![]() |
#3
|
|||||
|
|||||
![]() So long time coming an update
![]() Tank now been running a month, live for 3 weeks. parameters NO2 =0 NO3 = .01 to.02 depending on how tired my eyes are PO4 = 0 Ca = 440 DKH = 8 Mg = 1390 Salinity 34PPT temp = 28 Redox mV = 423mV pH = 8.01 The tank is doing really well i have not had to scrape the glass once for algea, bio bloom white film yes, but not algea. i am now running ProdiBio for 5 days and the corals are loving it. I would say there is no difference as yet I can report from FM to prodi both are equally good at nutrient reduction, but as i do not have room for a reactor I am sticking with prodi. I also hate daily dosing so prodi wins hands down on that score alone ![]() There is also room to think about mixing and matching products but my tank is way to young to start any fancy reviews like that. Ok back to the tank. I got some awesome corals from ottawa inverts, I am lucky to share the same town as pat so have easy access to his huge coral racks. Pat you need more space!!! Pictures - As you will see below much to many peoples delight the Ai lamp hangers are finished. ![]() ![]() I hope this now meets with everyones approval ![]() Here are some tank shots, I apologise now for the quality I am no good at photography at all, but i think you get a good idea how things are coming along. ![]() ![]() ![]() ![]() ![]() I will continue with the profiLux tutorial/review later this week. Last edited by Aqua-Digital; 03-31-2010 at 02:17 AM. |
#4
|
|||||
|
|||||
![]() Did you put your dosing pump on the same shelf as the profilux? or somewhere more accessible to the sump? From the pics it looked like your shelf went straight to the door.
|
#5
|
|||||
|
|||||
![]() The doser wil go next to the profiLux and holes will be drilled through to accomodate the 1/4 pipes.
I will take pics once installed ![]() |
#6
|
|||||
|
|||||
![]() That should look really clean! love the build so far
|
#7
|
|||||
|
|||||
![]() Thanks
![]() Just added a bottle of live pods to the system, that should liven things up a bit ![]() |