
|
|
|
#1
 08-13-2009, 12:57 AM
|
||||
|
||||
|
I recently bought a 72g bowfront and want to have it drilled. I can bring it to aquatic addictions for drilling @ $25 a hole and they will do the overflow for $45, But Dan is not that familier he said with herbie overflows. So i was hoping for some advice, I want to put in two drains to the sump, the main drain and the emergency drain. And 2 return drains? I tried googling this for hours but not many diagrams with single overflows. My question is where is the best place to have the holes to the sump drilled, in the corner or center, and should i have all 4 holes drilled the same size? I read to either get 1 1/2 inch bulkheads or do 1 inch bulkheads and use 1 1/2 piping. Is it hard to silacone your own overflow in, should i just get them to do it. I also read silicone doesnt work well with acrylic, so was wondering what one uses to attach a overflow box to the glass tank. And last does anyone have any pictures of their herbie style overflow with a single overflow i could see, or any good sites with pictures. I see alot of talking about it but not to many pictures? Any help would help :O) Hoping to drill it this weekend
Also do i need 2 returns or can i get one and just use a couple korelias for more flow in the tank Last edited by megs_clark; 08-13-2009 at 12:59 AM. 
|
|
#2
08-13-2009, 01:13 AM
|
|||||
|
|||||
|
here's diagram fr rban on RC but the concept is rather simple, two holes. The Overflow chamber can be internal or external.
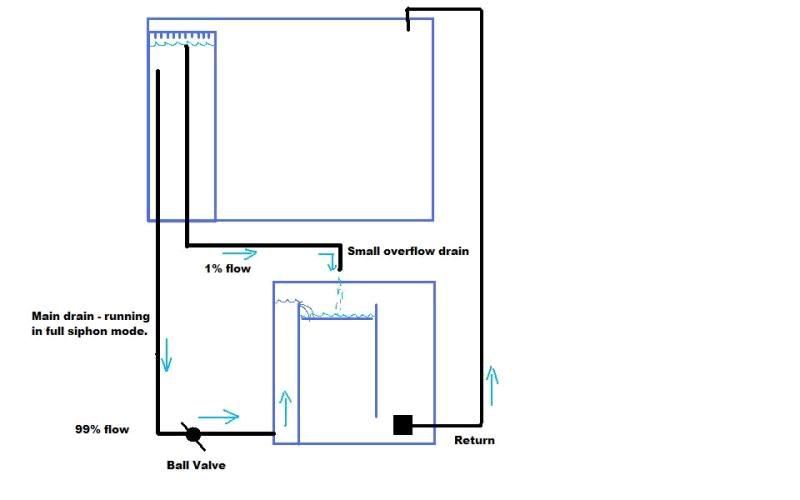 The diagram shows the main drain coming into the side of the sump but it doesn't have to be. Use a gate valve rather than a ball. As for drilling the sump, assume your planning an external pump. Think how you're planning on placing the return pump and laying out the sump, that will give on idea where to drill. For the overflow chamber, if internal could just have a diaginal in the corner. For the overflow, make it from glass and so you don't have to worry about the silicone not holding, can line with a thin sheet of dark acrylic. If going 1" primary drain, can flow about 600gph, 1.5" close to 1200gph and that's a fair bit for a return on a 72g. Often for additional flow within the display, people do power heads or CL.
__________________
my tank Last edited by mark; 08-13-2009 at 01:27 AM.
|
|
#4
08-13-2009, 02:07 AM
|
||||
|
||||
|
perfect, will do that and make sure i use a gate valve, thanks
|
|
#5
08-13-2009, 02:51 AM
|
|||||
|
|||||
|
If you want a gate valve and other plumbing for unbeatable prices order from www.bulkreefsupply.com they have a great shipping policy too so you don't get surprise bills afterwards.
If I were you I would drill both drains for 1" bulkheads. They are good for 600 gph, which you wouldn't even want that much in a 72 anyway. I wouldn't drill a return, just run it up and over the edge. Since doing it this way on my 90 I doubt there will be a future that I will drill another return. Also, your return is not considered to be any sort of considerable flow. In fact, your return isn't even counted towards your turnover when discussing flow in your tank. You should have about 5-6x turnover through the sump for maximum efficiency, and low risk for microbubbles making their way to your display. You use powerheads for flow.
|
|
#6
08-13-2009, 03:13 AM
|
||||
|
||||
|
Thanks Myka, I took your advice and am on that site right now and looks great, they even have overflows lol. I was thinking if i put in a glass overflow i still need to cut the glass for the water to flow through, hmmm, not sure how to do that. Thanks for the tip on not drilling for the returns. Save me a little money that i could put toward a couple powerheads. Im torn now on just buying a bit to drill the glass ourselfs, my husband has never done it before. I thought the bits were expencive but their sure cheap on that site. Got me thinking now, lol, Myka have you ever drilled a whole, is it hard or basic, hes usualy handy like that, lol. Whats your opinion. Crazy how things add up so fast. I just want to make sure i do it right. OH one more thing their were gate valves on the site that come apart for cleaning for $30 or that are one piece ( cant take apart to clean) for $20. Will i need to take it apart to clean.
|
|
#7
08-13-2009, 03:28 AM
|
|||||
|
|||||
|
Oh, I forgot about your overflow question...for DIY overflows you can get glass cut for it, and then silicone some black acrylic to the tank side of the overflow so you can't see in. You can't just silicone an acrylic overflow in because as you've heard it doesn't work perfectly, and you need that overflow to be 100% water tight or you will have a big flood when the power goes out. If your overflow has a straight top (no teeth) you can use eggcrate siliconed to the top for the water to flow through. If you need some pics of all this my tank is done like this and I could take some pics tomorrow when the lights are on...same with the Herbie.
Holes are easy to drill...you could always practise on a spcrap piece of glass before you try the tank. The biggest challenge is holding the bit in the right spot while you start it. You always have to start on a bit of an angle too, get it going a bit and slowly get it all th way around. I always drill outside and use the hose turned on the bit, you have to drill wet, not dry. Oh, and go slow! A 1" hole will easily take 15 minutes of drilling or more. I have bits from BRS, and they work well, but they are cheap because they are only good for maybe 10 holes or so. I personally put out the extra few bucks for the Spears gate valve because being able to clean it really helps once the tank has been up and running for a year or more. It's worth the extra bucks.
|
|
#8
08-13-2009, 03:45 AM
|
||||
|
||||
|
And when your drilling your hole make sure to put a piece of masking tape on the inside,so that when you go trough the glass the cut out doesn't fall and smash your front glass(that sucks trust me
If you cant run a steady flow of water when cutting,you could build a water dam with playdoo fill half way with water
|
|
#9
08-13-2009, 03:49 AM
|
||||
|
||||
|
Awsome. Woohooo, Im excited about getting this done. Sounds like shipping is pritty decent time wise. Totaly excited about us doing the holes. I imagine their will be more tanks to come in the future that ill want drilled, :O) I will definilty go for the valve that comes apart like you said. Probably get alot of salt build up over time. And i had not even thought to add egg crate, great idea. I liked the idea of siliconing the glass in like Mark had said but couldnt think of a easy way of making the teeth so the egg crate will solve that perfect. I also like the idea of doing it all at home and not lugging the tank to the store for drilling. Thanks so much for your all you guys input. will put it to good use!
|
|
#10
08-13-2009, 03:52 AM
|
||||
|
||||
|
Ohhh that would suck getting through cutting ok to have it break on the other side of the glass. Will deffinitly do the tape thing, and we always have playdoh kicking around so will do that to! Thanks Swear i speant so long googling all this, should have just asked for advice right way, Hands on advice is always better !
|


 Linear Mode

