Canreef Aquatics Bulletin Board  

Go Back   Canreef Aquatics Bulletin Board > General > Tank Journal

Reply
 
Thread Tools Display Modes
  #1  
Old 02-25-2007, 08:30 PM
Fish's Avatar
Fish Fish is offline
Member
 
Join Date: Jul 2004
Location: Okotoks, AB
Posts: 724
Fish is on a distinguished road
Default

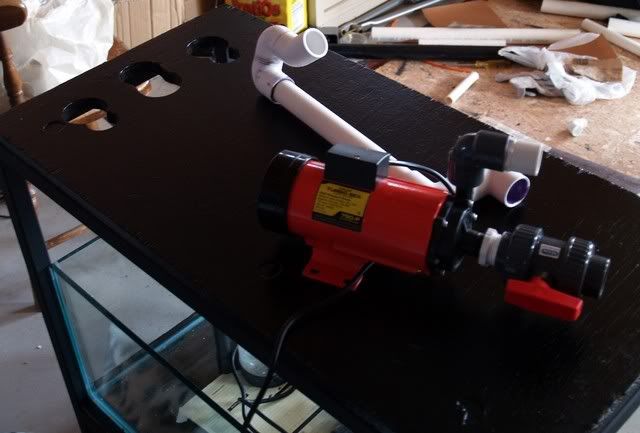
Andy are you talking about the photos? The plumbing you see in the first pic is one of my return pipes and they will just hang over the top of the tank.

I do realize that I need to brace the pipe coming from the closed loop so that all that weight isn't sitting on the bulkhead. Because the glass is 1/2" thick, I'm not going to break the tank unless I really reefed on it (fortunately I have gotten in the habit of overbuilding tanks whenever there are bulkheads involved)... but a crack in that bulkhead would be equally catastrophic and would drain the tank down 2/3 of the way.
Thanks,

- Chad
__________________
Returning to the hobby after an eight year absence.
Reply With Quote
  #2  
Old 02-25-2007, 08:41 PM
AndyL's Avatar
AndyL AndyL is offline
Member
 
Join Date: Oct 2004
Location: Beiseker
Posts: 900
AndyL is on a distinguished road
Send a message via MSN to AndyL
Default

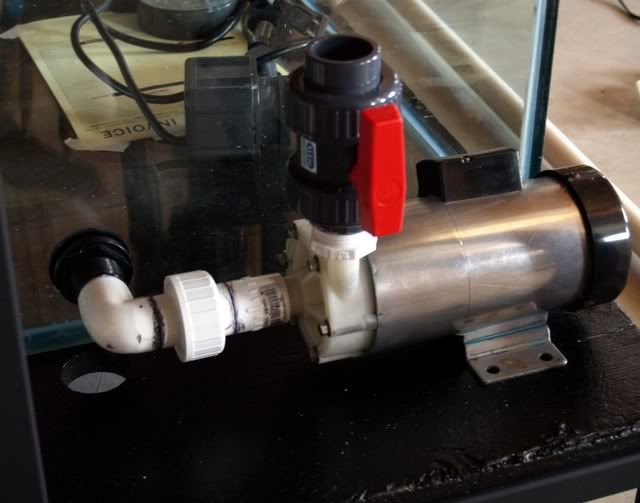
That's exactly what I'm talking about... Even with 1/2" glass I'd be concerned - with such a short length of plumbing 'feeding' the pump - there's going to be a significant transfer of vibes/resonance from the pump to the bulkhead (thus to the glass). Temporarily plumb it in - fill the tank and run it - put your hand on the pane that feeds, and on the pump... You'll feel the vibration through both.

When you've got a couple feet (like often seen on big tanks) between the bulkhead and pump - that few feet of pvc acts as a vibration isolator; but in your setup there's nothing really there to isolate - you've got less than 6" which isn't enough 'free space' to have the same effect... I did the same as you have on my 7g bf even with careful plumbing of the closed loop - the vibration of the mag 3 alone was enough to snap the back glass corner to corner.

A small hunk of flex between the 90 and the union or between the union and the pump would go a long way.

Just my .02, not trying to criticize, just pointing out something I've learned in the past.
__________________
By reading, replying to, commenting about, or in any way accessing the material in this post; including but not limited to storing in a database, retrieving from a database, viewing in a web browser, including it in or making a reference to it in a legal document, or accidentally glancing at it you agree to send me $100.
Reply With Quote
  #3  
Old 02-25-2007, 08:56 PM
Delphinus's Avatar
Delphinus Delphinus is offline
Member
 
Join Date: Dec 2001
Location: Calgary
Posts: 12,896
Delphinus has a spectacular aura aboutDelphinus has a spectacular aura aboutDelphinus has a spectacular aura about
Send a message via MSN to Delphinus
Default

Western Pump is a good place to get the spa flex tubing. I second Andy's comments, always use short lengths of spa flex or even just vinyl tubing between bulkhead and pump, even if the vibrations aren't enough to crack glass, the flex pipes will absorb the vibrations and lessen that "hum" sound you'll get.
__________________
-- Tony
My next hobby will be flooding my basement while repeatedly banging my head against a brick wall and tearing up $100 bills. Whee!
Reply With Quote
  #4  
Old 02-25-2007, 10:10 PM
Fish's Avatar
Fish Fish is offline
Member
 
Join Date: Jul 2004
Location: Okotoks, AB
Posts: 724
Fish is on a distinguished road
Default

Oh I see, I thought you were talking about closed loop plumbing. What you are looking at in the photo is the sump and sump return pump. Luckily the closed loop and sump return plumbing to the display tank is each about 4' in length, plastic, and full of fluid (great qualities if you want to isolate vibes!). Unfortunately though I am cramped for space with the sump return pump. As you can see in the photo, the pump is on the very edge, almost hanging off of the stand - and that is after I cut down each of the PVC fittings by half with a hacksaw! There is no room for any tubing from the elbow to the pump (unless I took out the quick release union... I guess I could). Even if I put flex tubing from the bulkhead to the elbow there is so little free space that direction that the flex tubing would have to be so short there wouldn't be enough there to 'flex', the fittings would almost be touching each other.

Great ideas guys, and if there was another way of doing it, I would have. On past tanks I have even used a hosebarb on the sump bulkhead, and hosebarb on the pump, and 6" of hose between the two. It might be a little tough to visualize from the photo, but I don't have any extra room.
On the bright side, there isn't any unsprung weight on the bulkhead. I connected the pump to the bulkhead first and then siliconed and tightened the bulkhead down so that it set in the neutral position without any weight on it....

- Chad
__________________
Returning to the hobby after an eight year absence.

Last edited by Fish; 02-25-2007 at 10:29 PM.
Reply With Quote
  #5  
Old 03-02-2007, 01:33 AM
Fish's Avatar
Fish Fish is offline
Member
 
Join Date: Jul 2004
Location: Okotoks, AB
Posts: 724
Fish is on a distinguished road
Default Update

Well I scrapped the plan to bolt the closed loop pump to the underside of my stand - it would have been nice to be able to tuck it up out of the way, but it would have made it a lot harder to service the pump. Fortunately, I came up with a new plan that I am pretty excited about, despite being short on building materials... and tools.....
and technical skill

This is what it looks like now:


It should look good when it's done though.


Here is a shot of some of the plumbing that I have glued already (you can see both the returns that will come over the top of the tank):


I was actually going to paint the plumbing today but I took my sump tank in to the local glass shop so they could measure and cut a baffle pane for me. They ended up keeping the tank until tomorrow and I can't finish my plumbing measurements and cuts without it.


- Chad
__________________
Returning to the hobby after an eight year absence.
Reply With Quote
  #6  
Old 03-03-2007, 01:34 AM
Fish's Avatar
Fish Fish is offline
Member
 
Join Date: Jul 2004
Location: Okotoks, AB
Posts: 724
Fish is on a distinguished road
Default

Update:

Here are a couple photos of the plumbing routed and test fitted. (The in-stand pics have a back background because I leaned a board against it for the photos - didn't want to hang that leopard blanket again .

It should give an idea of how things work:


The sexy-silver Iwaki is the sump return and the red Coralife is running my closed loop.


View from the back:


I just realized that I didn't have the other drain tube connected for this picture, sorry. The pipe on the left is my drain with ball valve (for Herbie method), the center pipe is connected to the closed loop bulkhead in the back wall of the display, and on the right (not pictured) will be my emergency drain pipe.

Cheers,

- Chad
__________________
Returning to the hobby after an eight year absence.
Reply With Quote
  #7  
Old 03-04-2007, 03:15 AM
Fish's Avatar
Fish Fish is offline
Member
 
Join Date: Jul 2004
Location: Okotoks, AB
Posts: 724
Fish is on a distinguished road
Default

Update:

Here is a shot of the underside of the bottom piece of the stand (the 5lb weight is just holding it down while the glue hardens):


I am putting my power bar upside down on the underside of the stand so that I can route all my wires through the holes and then have the tank in the middle of the room with only one electrical cord connecting it to the wall. I glued the power bar inside a Tupperware container so that it will be impossible for any spilled water to get to it. I also bought a mountain bike tire tube and cut it into four lengths. I will lay the rubber strips along the frame rails and then lay the board on top of them (and the sump etc on top of that). I am expecting that it will provide some cushioning and prevent vibrations from being transferred to the stand (like a rubber mounted motorcycle engine?).
Sorry, that paragraph was probably confusing...


Yesterday I cleaned all my plumbing connections with pvc solvent and glued them together. Because of the diversity of my pieces, I had to buy pvc glue, abs glue, and abs to pvc glue! I still have three full jars if anyone needs - seriously.

Today I sanded, rinsed, dried and taped all my plumbing to get it ready for painting:


And ...............


.......here is the result:


The bottom pipe is my intake from the closed loop bulkhead
The middle pipe is my sump return line
And the top pipe is my closed loop return line
Hope you like it.

And thanks to Andy for putting me onto abs fittings - it allowed me to turn a tighter corner from my closed loop bulkhead and fit my pipe within the frame.

Cheers!
- Chad
__________________
Returning to the hobby after an eight year absence.

Last edited by Fish; 03-04-2007 at 03:32 AM.
Reply With Quote
Reply


Posting Rules
You may not post new threads
You may not post replies
You may not post attachments
You may not edit your posts

BB code is On
Smilies are On
[IMG] code is On
HTML code is Off
Forum Jump


All times are GMT. The time now is 05:04 PM.


Powered by vBulletin® Version 3.7.3
Copyright ©2000 - 2025, Jelsoft Enterprises Ltd.