
|
|
|
|
|
#1
 05-25-2008, 03:40 PM
|
|||||
|
|||||
|
This will be a cool tank, I helped setup a display tank at Bayside Corals here in Saskatoon. Very similar, same dimensions, controller, tunze setup, uses BK skimmer and so on. Only picture I have is after initial setup, if you're in the city sometime you should check it out. Super nice tank with all the goodies we all can only dream about.
|
|
#2
05-26-2008, 06:43 AM
|
|||||
|
|||||
|
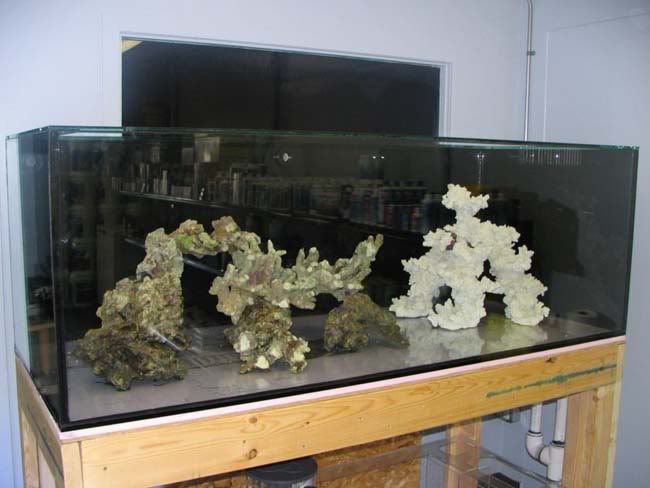
That looks promising already =) I like the rock structure on the left. Is the right side reef ceramics?
Cut my foam for the top and I'm told I'll have the tank this friday! The foam isn't tacked down...what do people typically do? I want to avoid gluing it due to hardened glue spots maybe making pressure points but I'm guessing when we try and get the tank on there they'll move and cause us grief... Mounted the 3/4" sliding doors tonight. There is a bit of warp in the left side but I'm going to attach a vertical piece of plywood near the inner end of each door to pull the panels a bit flatter. Since the doors don't open 100% this extra plywood brace inside the door won't quite hit the stand's 2x4's. These are 22" sliders and are safe to 100lbs. I did some mods to the safety stops to give me a few extra inches of slide and after comparing the wobble at full extension to the original configuration it is the same. They wobble a touch when fully extended but are rock-solid when fully closed. A 5/8" plywood lip will be attached to the tops and sides of the doors to receive tile as well, then the sides will have an additional layer of 5/8" plywood to flush them to the door ends.    Last edited by lastlight; 05-26-2008 at 07:11 AM.
|
|
#3
05-26-2008, 01:40 PM
|
|||||
|
|||||
|
Good idea on the doors, that'll create a nice clean look, very slick.
The right rock structure is a reef ceramic. Something I would use if I could go back. It's got lots of cupped areas, perfect for placing corals.
|
|
#5
07-16-2009, 05:48 AM
|
|||||
|
|||||
|
So tonight was a bit frustrating. The good news is I got the lift mounted on my ceiling. I don't trust the 5/8" enough to stand on it so this was a really tough task leaning out over the tank. In the end a step-stool, box of pampers and a bunch of children's books came to the rescue to hold the assembly in place! Props to Sfiligoi for making one hell of a sturdy light. I'm sure I could stand on the thing. It has ZERO flex.
 Now for the bad news. The bracket on the end of the screw/shaft still seems to do what it wants especially under load where the forces are quite high. The fixture I'm guessing is 60lbs or so with the glass shields so I'll have to adjust my guide for the bracket to allow it to orient like it does under weight and that's it. I need to ensure the bracket always does exactly the same thing in both directions. If it doesn't and something catches after my cover is installed it will rip the entire thing to shreds. 150 lbs of force it's capable of. The bigger letdown was the fact that the angle brackets I have the bearings mounted to bent under load. The bearing on the far left is mounted closer to the wood and it bent far less. One of the bearings for the other wire bent a lot. I was foolishly thinking these brackets were ok because the forces are downward only and they felt solid in that respect. Of course the forces on them are horizontal as well! So I need to swap these with wide brackets that allow zero movement in the horizontal axis. Slightly bent:  Really bent.  On a positive note these issues can be easily fixed. The side with the slightly bent bracket lifted up about 4 inches before I chickened out. It was an incredibly smooth motion! The other end didn't lift at all though. I'll update with a video tomorrow night when I have new brackets installed... Last edited by lastlight; 07-16-2009 at 05:55 AM.
|


 Hybrid Mode
