
|
|
|
||||||||
| Portal | PhotoPost Gallery | Register | Blogs | FAQ | Members List | Calendar | Search | Today's Posts | Mark Forums Read |
 |
|
|
Thread Tools | Display Modes |
|
#1
 02-19-2012, 06:45 PM
|
||||
|
||||
|
I have had a 75 G for a few years and I was doing really well until I replaced the sump, which entailed a move of the livestock and the tank.... I didn't replace the sand. I have been fighting with it for over a year now to try and get it back in balance....
So I have been hemming and hawing about how to start again, so I can do it properly. Well, I have just purchased my replacement tank... It is 165 Gallon (72X24x20). I won't actually get it until May sometime and we will build the stand for it ourselves. This will be a long build as, I have decided that I am going to get everything I need before I start and as I live where there is no LFS... It will all be trips out and mail order. I am working on my equipment list and it is slow going.... I know I have to replace my skimmer, but trying to decide which one is the better is not easy. The price range is amazing as well. I currently have a Vertex 80 and I have no real complaints about that brand. But why would similarly sized protein skimmers range in price from 350 - 1600 dollars. I haven't found a whole lot on the diffrence between them but crap are the Bubble Kings ever expensive and I really don't know if it is just brand name or they are better quality. I have a 48" T5 Tek Light which I love. 6 bulbs, I can't remember the wattage. I will keep it but I am trying to decide whether to have 2 LED pendants or 2 Halides at either end. I am also trying to decide if I can talk my husband into giving up a corner of his office for the sump to be in the basement.... I don't think I will be totally successful with that, so I have to make sure everything is quiet enough and fits under the cabinet. I would love any advice I can get as I am far away from person to person contact in the saltwater community... feeling isolated I guess. Feel like a newbie all over again. Last edited by CherylMcKay; 02-19-2012 at 06:48 PM. Reason: added picture 
|
|
#2
02-19-2012, 08:22 PM
|
|||||
|
|||||
|
Quote:
I took the leap into LED's with the Echotech Radions. I'm thinking that I can pretty much do whatever kind of tank, and lighting will not be no problem. As far as skimmers go, my suggestion would be to check in with Asmodeus. His former handle was The Skimmer King. From what I have seen he is the guru of all things skimmer. I think the prices reflect a definite difference in quality but I wouldn't even look at a BK unless I had a tank full of SPS. Best thing about Canreef is that there are a lot of people with tons of experience who are very willing to share.
__________________
Mike 36 Gallon Saltwater http://www.canreef.com/vbulletin/showthread.php?t=72283 90 Gallon Slow Build http://www.canreef.com/vbulletin/showthread.php?t=82824
|
|
#3
02-27-2012, 03:14 AM
|
||||
|
||||
|
Well the list is coming together. I know I am getting a RO/DI,auto top off(tunze) and replacing the sump.
What is the ratio of sump to tank I should look at. Is it just a matter of being able to get my equipment in it or is there a calculation based on tank size?
__________________
CherylMcKay's 2012 Nano Contest Entry
|
|
#4
04-23-2012, 04:49 PM
|
|||||
|
|||||
|
Quote:
I am sure that there is some equation for this. But my opinion is that what ever you can accommodate under your tank that fits all your equipment. LOL If its an external sump then really there is no limit up too actually DT size. Any new updates ???
__________________
Mike 36 Gallon Saltwater http://www.canreef.com/vbulletin/showthread.php?t=72283 90 Gallon Slow Build http://www.canreef.com/vbulletin/showthread.php?t=82824
|
|
#5
04-23-2012, 04:59 PM
|
|||||
|
|||||
|
Quote:
__________________
Christy's Reef Blog My 180 Build Every electronic component is shipped with smoke stored deep inside.... only a real genius can find a way to set it free.
|
|
#6
04-23-2012, 06:28 PM
|
||||
|
||||
|
For sump size I would make it large enough so that you can do the amount of gallons for water changes that you are planning which means you don't have to remove water from the display, and also make it large enough so it can handle the water that flows back from the display tank during a power outage.
As for skimmers yes it would be nice to have a bubble king as they are of amazing quality but for a quarter of the price i'm running a bubble magus skimmer on my full SPS tank and its has been great.
|
|
#7
05-13-2012, 11:30 PM
|
||||
|
||||
|
Well, the tank arrived and I will open it when I return home on the 18 th. Build the stand and then empty the 75 gallon and put the fish, rock and corals in holding tanks while I build this one out.
I will pickup sand and maybe some macro algae down here. Otherwise I have most every thing else...bought just waiting for it to arrive.
__________________
CherylMcKay's 2012 Nano Contest Entry
|
|
#8
05-14-2012, 03:02 AM
|
||||
|
||||
|
Here is the tank sitting beside the house. Still packed up from the trip up the Alaska highway. It is packed in a 1/2 inch plywood with 1/2 inch rigid foam around it.... I am keeping my fingers crossed that when I open it on the 18th all is good.
Last edited by CherylMcKay; 05-14-2012 at 03:04 AM. Reason: adding picture
|
|
#9
05-14-2012, 01:34 PM
|
|||||
|
|||||
|
Let the fun begin, all that extra room to stock with corals and fish. Nice.
__________________
Mike 36 Gallon Saltwater http://www.canreef.com/vbulletin/showthread.php?t=72283 90 Gallon Slow Build http://www.canreef.com/vbulletin/showthread.php?t=82824
|
|
#10
07-05-2012, 01:58 AM
|
||||
|
||||
|
So the stand is built and the finishing on it is almost done. I used Flex coat waterproofing inside the stand and on the top. The rest is cabinet grade birch and I have just varathaned it.
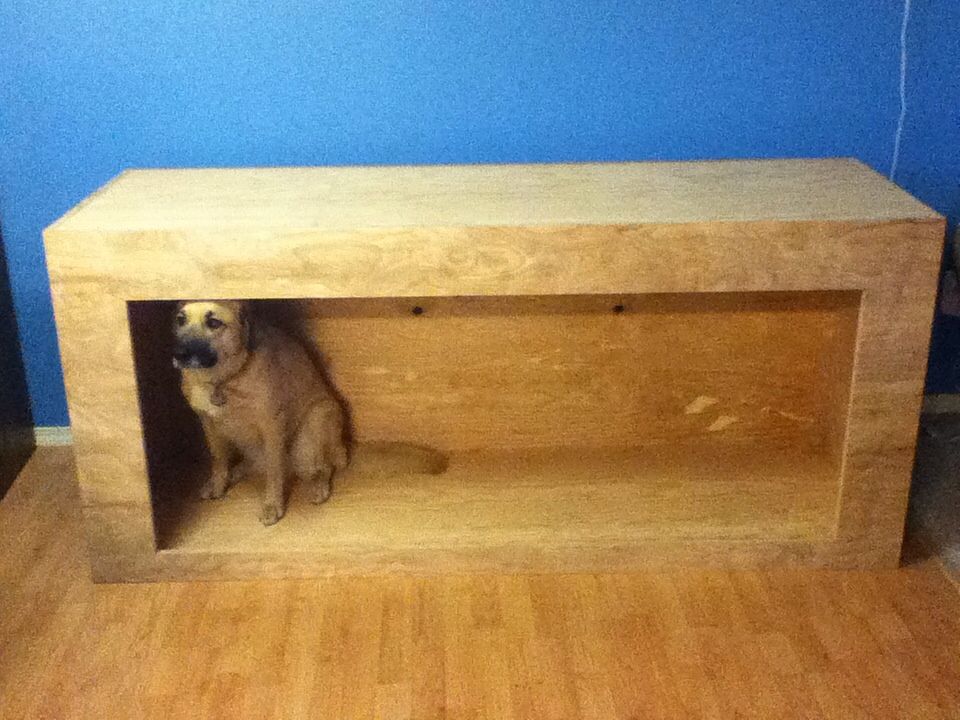 Before finishing Before finishingAfter finishing: 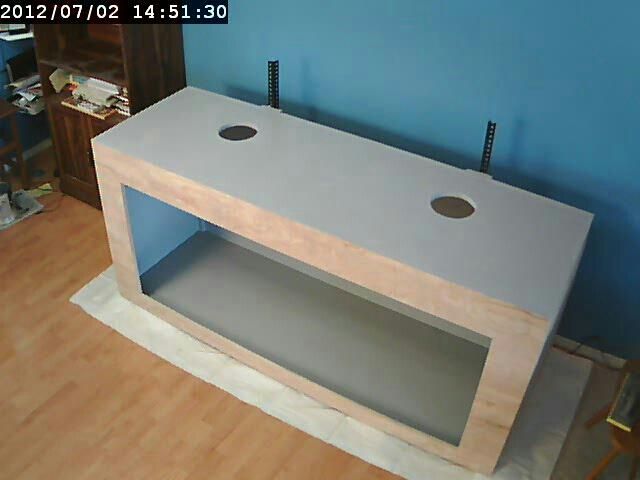 We decided to add 2 pieces of Angle Iron on the back bolted to the stand for putting on a light frame at a later date. I need to dry fit the sump and decide where I am going to put holes in the back for the returns. I also need some advice on how to plumb it. It has the return holes in the Eurobracing on the top and there are 2 holes in the bottom just behind the center of the tank. The bulk heads are 1 inch so I was thinking of having the 1 inch pipes to the level I want to drain and then put a 4 inch piece of PVC around them and attach my rocks to them so they are kinda hidden. Not sure if this is the best way, but I am really leary to drill the tank myself as if I break it I am out of luck and I already sold my 75 gallon.
|
|
| Thread Tools | |
| Display Modes | |
|
|


 Linear Mode

