
|
|
|
||||||||
| Portal | PhotoPost Gallery | Register | Blogs | FAQ | Members List | Calendar | Search | Today's Posts | Mark Forums Read |
 |
|
|
Thread Tools | Display Modes |
|
#11
 08-13-2009, 03:54 AM
|
||||
|
||||
|
Quote:

|
|
#12
08-13-2009, 04:25 AM
|
|||||
|
|||||
|
Quote:
If you want, have a look at the first couple pages of my tank journal http://www.canreef.com/vbulletin/showthread.php?t=40669 ....theres some fairly detailed pics of my herbie set-up.
__________________
260g mixed reef, 105g sump, water blaster 7000 return, Bubble King SM 300 skimmer, Aqua Controller Jr, 4 radions, 3 Tunze 6055s,1 tunze 6065, 2 Vortech MP40s, Vortech MP20, Tunze ATO, GHL SA2 doser, 2 TLF reactors (1 carbon, 1 rowa). http://www.canreef.com/vbulletin/showthread.php?t=50034 . Tank Video here http://www.vimeo.com/2304609 and here http://www.vimeo.com/16591694
|
|
#14
08-13-2009, 05:22 AM
|
||||
|
||||
|
Hi sean thanks for the tip. Im thinking im going to get my other half to do the cutting so am making a list of tips for him. I think he will do a few practic runs and will deffinitly get him to try that. It sounds like thats a tricky part. Getting the bit to stay at first. And Fishytime, great tank. Im only half way through your thread and it looks amazing!
|
|
#15
08-13-2009, 06:20 PM
|
||||
|
||||
|
Another tip is to set the clutch on your drill to a very low setting so if the bit binds up at all the clutch will kick in and hopefully prevent it from cracking. Drilling holes is easy, just take your time and keep the bit wet. Also don't drill to close to the edge, whatever size you are drilling leave at least that much space between the hole and the edge of the glass.
|
|
#17
08-13-2009, 08:46 PM
|
|||||
|
|||||
|
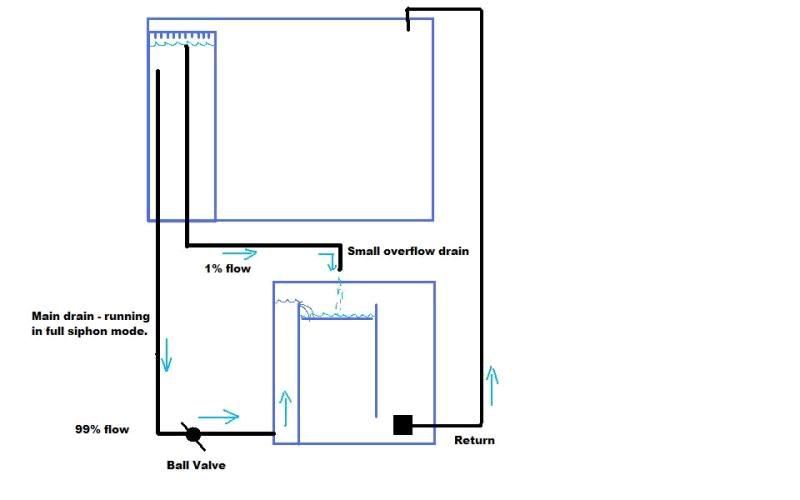
Quote:
1) The primary drain line (the one with the ball/gate valve) is shown in this diagram to have a tall standpipe up inside the overflow box. That pipe isn't necessary. In fact, I don't think it is a good idea. Optimally, the water level in the overflow box operates at some point which is ABOVE the primary drain, yet BELOW the emergency drain. In this diagram these two drains are very close in height, providing little room to operate. Further, if there isn't enough water depth directly above the primary drain, then it tends to form a vortex and suck air down...which defeats the entire purpose of the design. 2) As I just mentioned, the diagram shows the water level at the level of the emergency overflow. That's OK, but the system works more quietly at a water level slightly below that. If you ever want to come by and look at a variety of Herbie overflows in operation, just let me know. In my refugium, I have a standpipe on the primary overflow. It is there for a very specific reason which I can demonstrate to you.
__________________
400 gal reef. Established April, 2007. 3 Sequence Dart, RM12-4 skimmer, 2 x OM4Ways, Yellow Tang, Maroon Clown (pair), Blonde Naso Tang, Vlamingi Tang, Foxface Rabbit, Unicorn Tang, 2 Pakistani Butterflies and a few coral gobies My Tank: http://www.canreef.com/vbulletin/showthread.php?t=28436
|
|
#18
08-13-2009, 09:05 PM
|
|||||
|
|||||
|
There is a advantage to having a short standpipe on the primary in that though the Herbie method is silent, you can still get some noise from the water dropping into the overflow chamber.
This noise can be limited by lessening the drop (by raising the water level in the overflow chamber).
__________________
my tank
|
|
#19
08-14-2009, 05:55 PM
|
|||||
|
|||||
|
Another small tip regarding drilling the tank. Masking tape is a good idea, but for extra insurance place something soft below the area you're drilling just in case the tape doesn't hold. Even a piece of cardboard will do, but something a little thicker will be better to catch the 'donut' hole.
__________________
Mike 77g sumpless SW DIY 10 watt multi-chip LED build
|
|
#20
08-14-2009, 06:10 PM
|
||||
|
||||
|
Hi, Thanks for all the great advice, im just trying to track down a local drill bit (trying to get around waiting for the shipping) Seems easy to find 1 1/2 inch bits and 2" bits but can not find a 1 3/4 inch that i need for a one inch bulkhead. When i track one down i will be sure to use all your advice. Thanks for all the replys! Do you think i could drill with a 1 1/2 inch bit and use a diamond coated dremel to make it fit a 1" bulkhead? Or is that to risky
|
|
| Thread Tools | |
| Display Modes | |
|
|


 Linear Mode

