
|
|
|
||||||||
| Portal | PhotoPost Gallery | Register | Blogs | FAQ | Members List | Calendar | Search | Today's Posts | Mark Forums Read |
 |
|
|
Thread Tools | Display Modes |
|
|
|
#1
 08-30-2011, 04:44 AM
|
|||||
|
|||||
|
So here's a problem I'm hoping the wood-gurus can help me out with.
Here is my stand currently. It is a flush-skinned box essentially. The walls are drywalled now too which complicates what I am considering here.:  Here is a tank I recently found on RC: 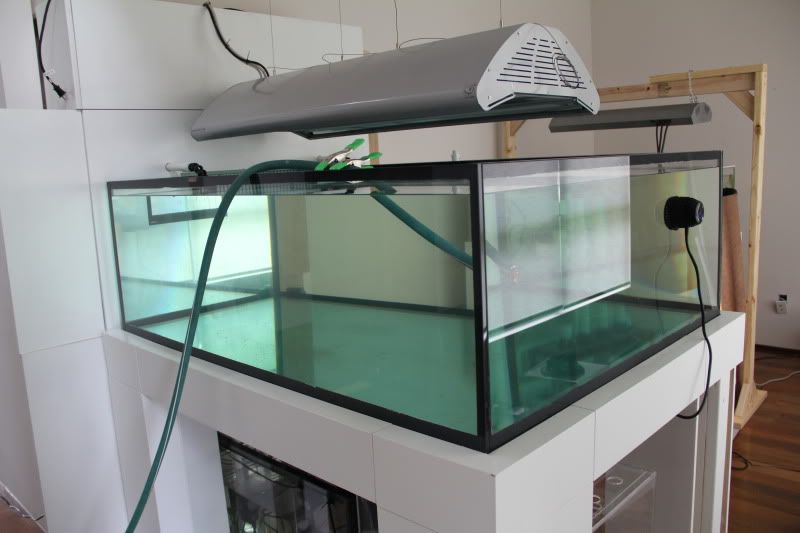 Rather than trim my stand I now want to scribe both horizontal and vertical lines into my plywood skin to create the effect of multiple pieces of wood. I only need to remove a saw-blade's width and about as much depth-wise. Maybe a bit deeper. I thought about using a guide and setting my skill-saw blade to do this but I can't do the flat trim that meets the glass nor the edges of the plywood that touch drywall. I also have a heavy duty utlity knife and I could score both sides of my scribe line and carefully go down the line scooping out the insides. Tough to get uniform depth this way tho. Perhaps saw where possible and then do the edges with knife/patience lol? Any ideas on how to do this? I require very straight and uniform lines or I'm not going to do it! Thanks! Last edited by lastlight; 08-30-2011 at 04:47 AM. 
|
|
#2
08-30-2011, 04:53 AM
|
|||||
|
|||||
|
gonna be very difficult indeed without takin the skin apart.....also incredibly difficult to get perfectly straight lines with a skilsaw(even with a guide) but if you wanna try that route then get as close as you can with the skilsaw and then try and do the rest with a dremel and guide????? I dont know????.....I think it would be a challenge for a master carpenter to make it look perfect after the fact.......the easiest would have been to do it on a table saw or router table before it was assembled....
__________________
260g mixed reef, 105g sump, water blaster 7000 return, Bubble King SM 300 skimmer, Aqua Controller Jr, 4 radions, 3 Tunze 6055s,1 tunze 6065, 2 Vortech MP40s, Vortech MP20, Tunze ATO, GHL SA2 doser, 2 TLF reactors (1 carbon, 1 rowa). http://www.canreef.com/vbulletin/showthread.php?t=50034 . Tank Video here http://www.vimeo.com/2304609 and here http://www.vimeo.com/16591694 Last edited by fishytime; 08-30-2011 at 05:19 AM.
|
|
#3
08-30-2011, 04:58 AM
|
|||||
|
|||||
|
Thanks man I was hoping you'd pipe up here.
I'm not going to do it then. It has to look very clean or it's all fail. I may adjust my plans to do very narrow and shallow trim almost like pin-striping. I'll need to make the trim wide enough to bridge the gaps between canopy and doors. Matching for the stand I guess. Poop!
|
|
#4
08-30-2011, 05:04 AM
|
|||||
|
|||||
|
Dremel tool with router attachment will do the trick. A little costly maybe, but comes with a guide that should make a straight cut without too much trouble. I used one of these to route out the grooves on wooden frame to install screening on a reptile enclosure I built for my daughter.

__________________
Mike 77g sumpless SW DIY 10 watt multi-chip LED build Last edited by mike31154; 08-30-2011 at 05:06 AM.
|
|
#5
08-30-2011, 05:12 AM
|
|||||
|
|||||
|
Definitely a dremel with a flex wand attachment and a small circular type saw bit will do the trick. I have one and have use it for a similar project.
__________________
Feed the bear goodies, make a new friend, don't feed the bear............... 8' - 165gal Reef DIY LED's Build 2012 Nano Contest Winner Febuary 2013 POTM Winner 300 gal + 60 gal Complete DIY Build
|
|
#6
08-30-2011, 05:19 AM
|
|||||
|
|||||
|
Or how about my cheap blade and some patience? I just snuck downstairs to test this idea out:
 I scored both sides of the valley and popped it out quickly in small bits to the depth of one ply. It's actually pretty easy to remove if you stick to ply-depths =) This took maybe 2 min. I'm going for it after I do a test going with the wood grain as well. Used the piece of drywall sanding screen to quickly sand inside the valley. I know I could do this even cleaner but once I paint this will easily look good enough.
|
|
| Thread Tools | |
| Display Modes | |
|
|


 Hybrid Mode
